Step by step guide to build a Bot with Microsoft Bot Framework
In this article I’m going to show you how to build a simple bot using https://dev.botframework.com/ platform and its SDK. Client Libraries for the Bot State REST API:
- Bot Builder for C# (the one we going to use)
- Bot Builder for Node.js
- Generate your own from the State API Swagger file
C# language and its SDK is a choice in this artcle.
wit.ai going to be used to understand a natural language from users. In fact, luis.ai from Microsoft can be considered as an alternative for wit.ai. Having tried luis.ai, I decided to go with wit.ai, because of it’s simplicity, some more reach functionality and Ukrainian language support. Definitely you should try luis.ai, since it’s being improved permanently, but in this article only wit.ai is the way to go :)
Project creation in Visual Studio
Advice:
- Use the latest Visual Studio version installed to avoid any unexpected behavior
- Download this project template file and put it directly in “%USERPROFILE%\Documents\Visual Studio 2015\Templates\ProjectTemplates\Visual C#" location. Don’t unarchive it
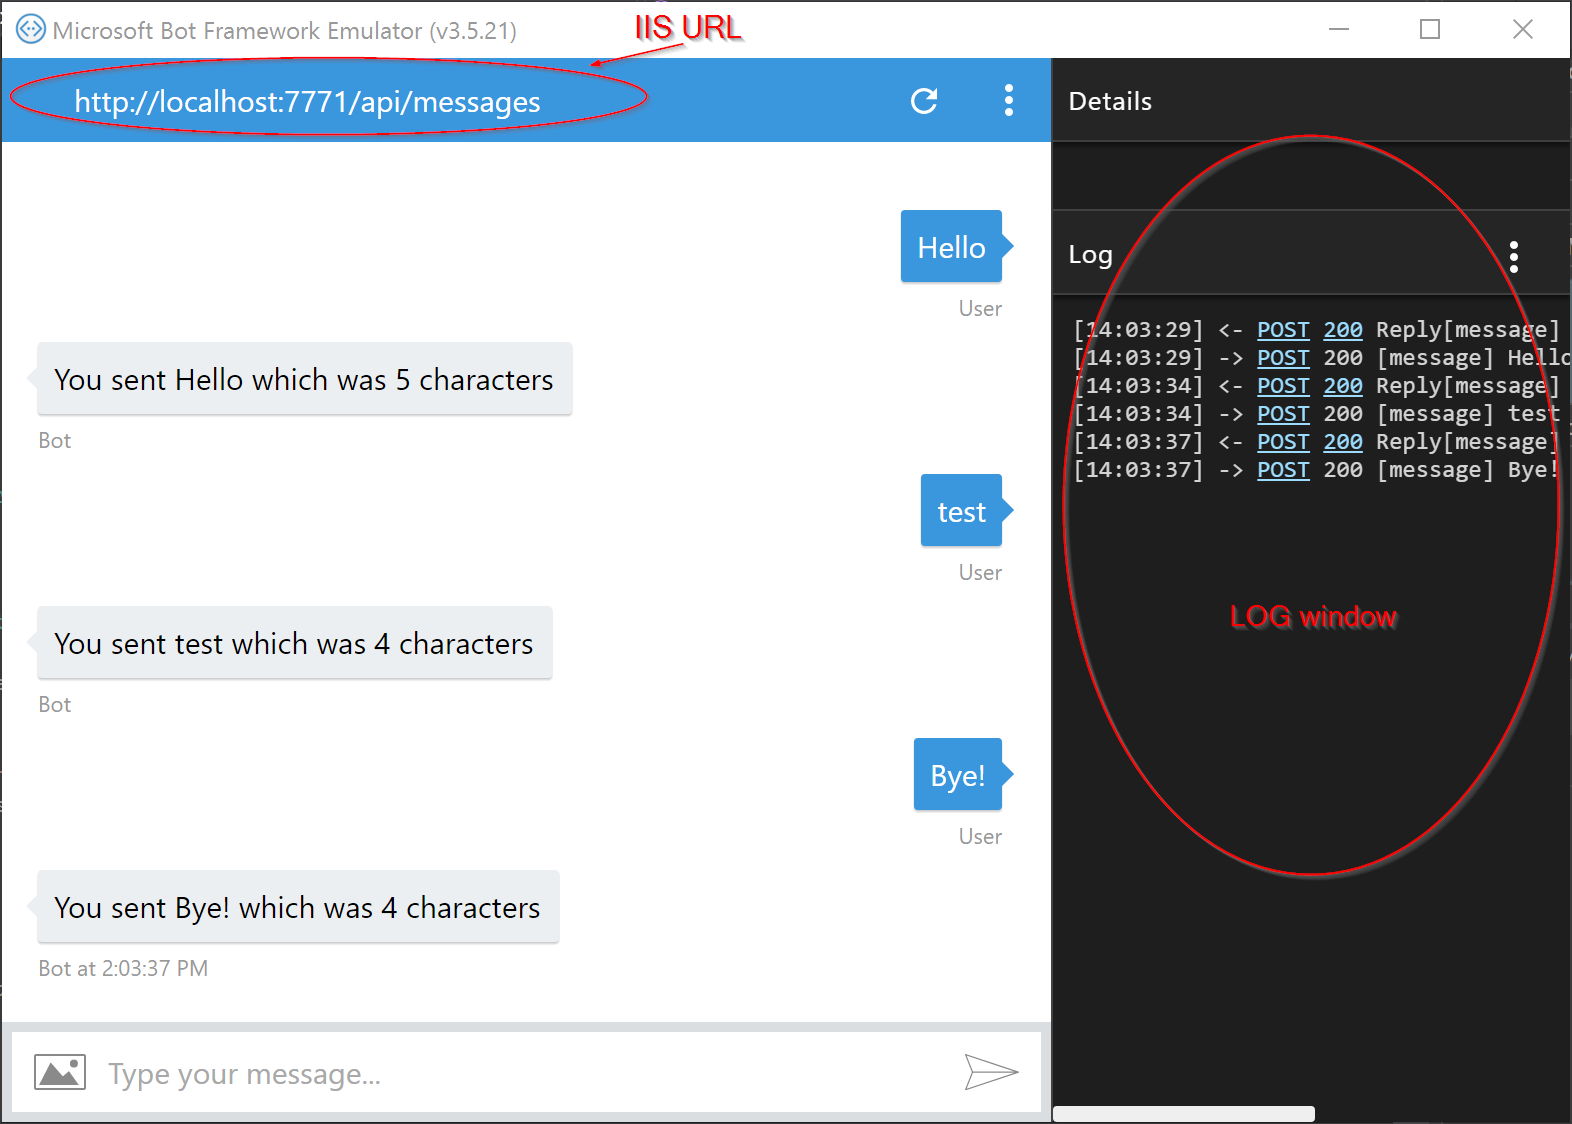
- Use local IIS option to debug your bot on a local environment. It’ll allow you to test a bot with no Visual Studio debugging running
- Download the Bot Framework emulator here. There are also Linux and Mac versions available, but I use Windows only, because Mac version doesn’t work for some reason.
- When you create a new project, just comment [BotAuthentication] attribute usage for now. Since this is a demo project, it’ll allow you to avoid connection issues during publishing it online.
Now, Bot Project can be created in Visual Studio:
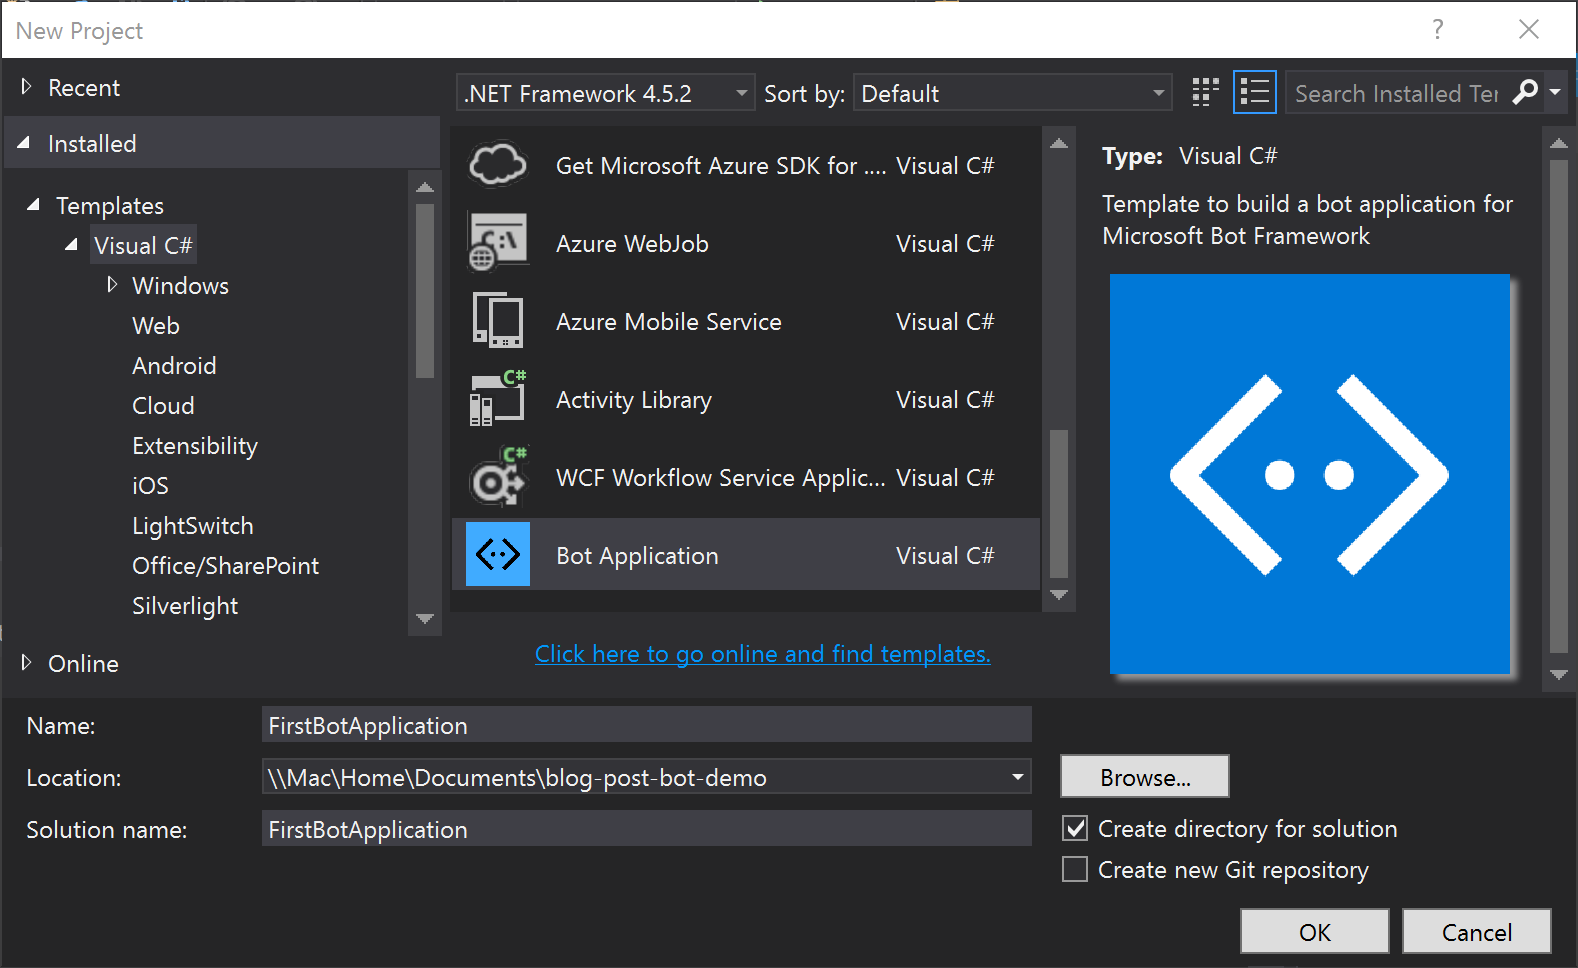
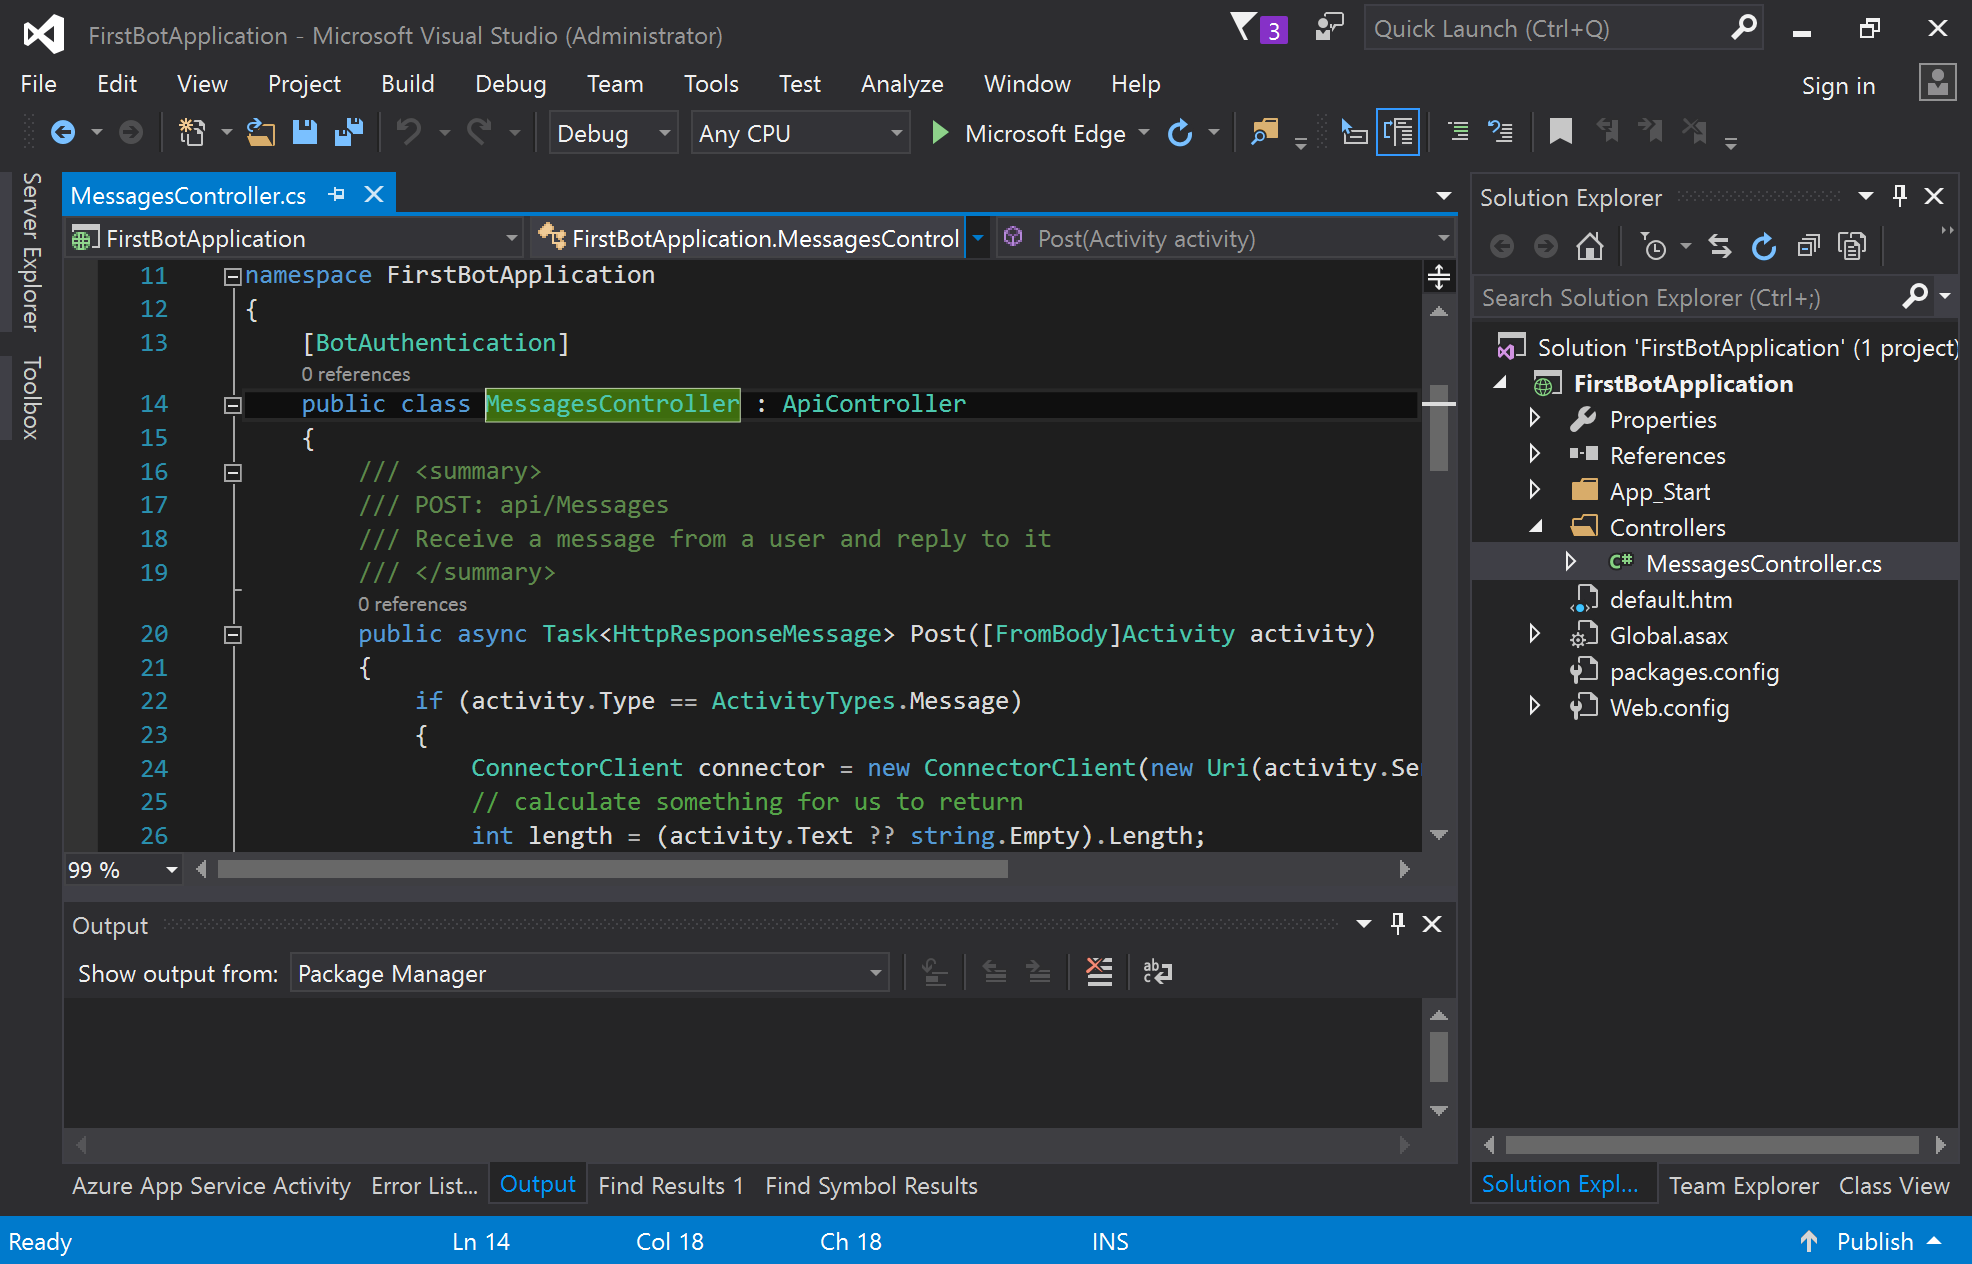
It is a natural ASP.NET MVC Web API application with just one controller and POST action inside of it. This is an entry point to the Bot. Default template implements an echo bot. Let’s start it the first time.
Integration with wit.ai
Wit.ai is an advanced Natural Language Processing tool. Go to its site and create a new app. Let’s call it DistanceCalculator and create a Story.
We’ll create a phrase ‘What is a distance from London to Berlin’. Wit helps us to parse it and fetch two given locations. See an animation below on how to create a wit story.

Wit provides an API. You can get a text phrase from user to bot, call wit API route and get a JSON object with parsed data.
Let’s see how it works. I’ll send a different phrase to wit - ‘Can I get a distance from Sydney to Madrid?’.
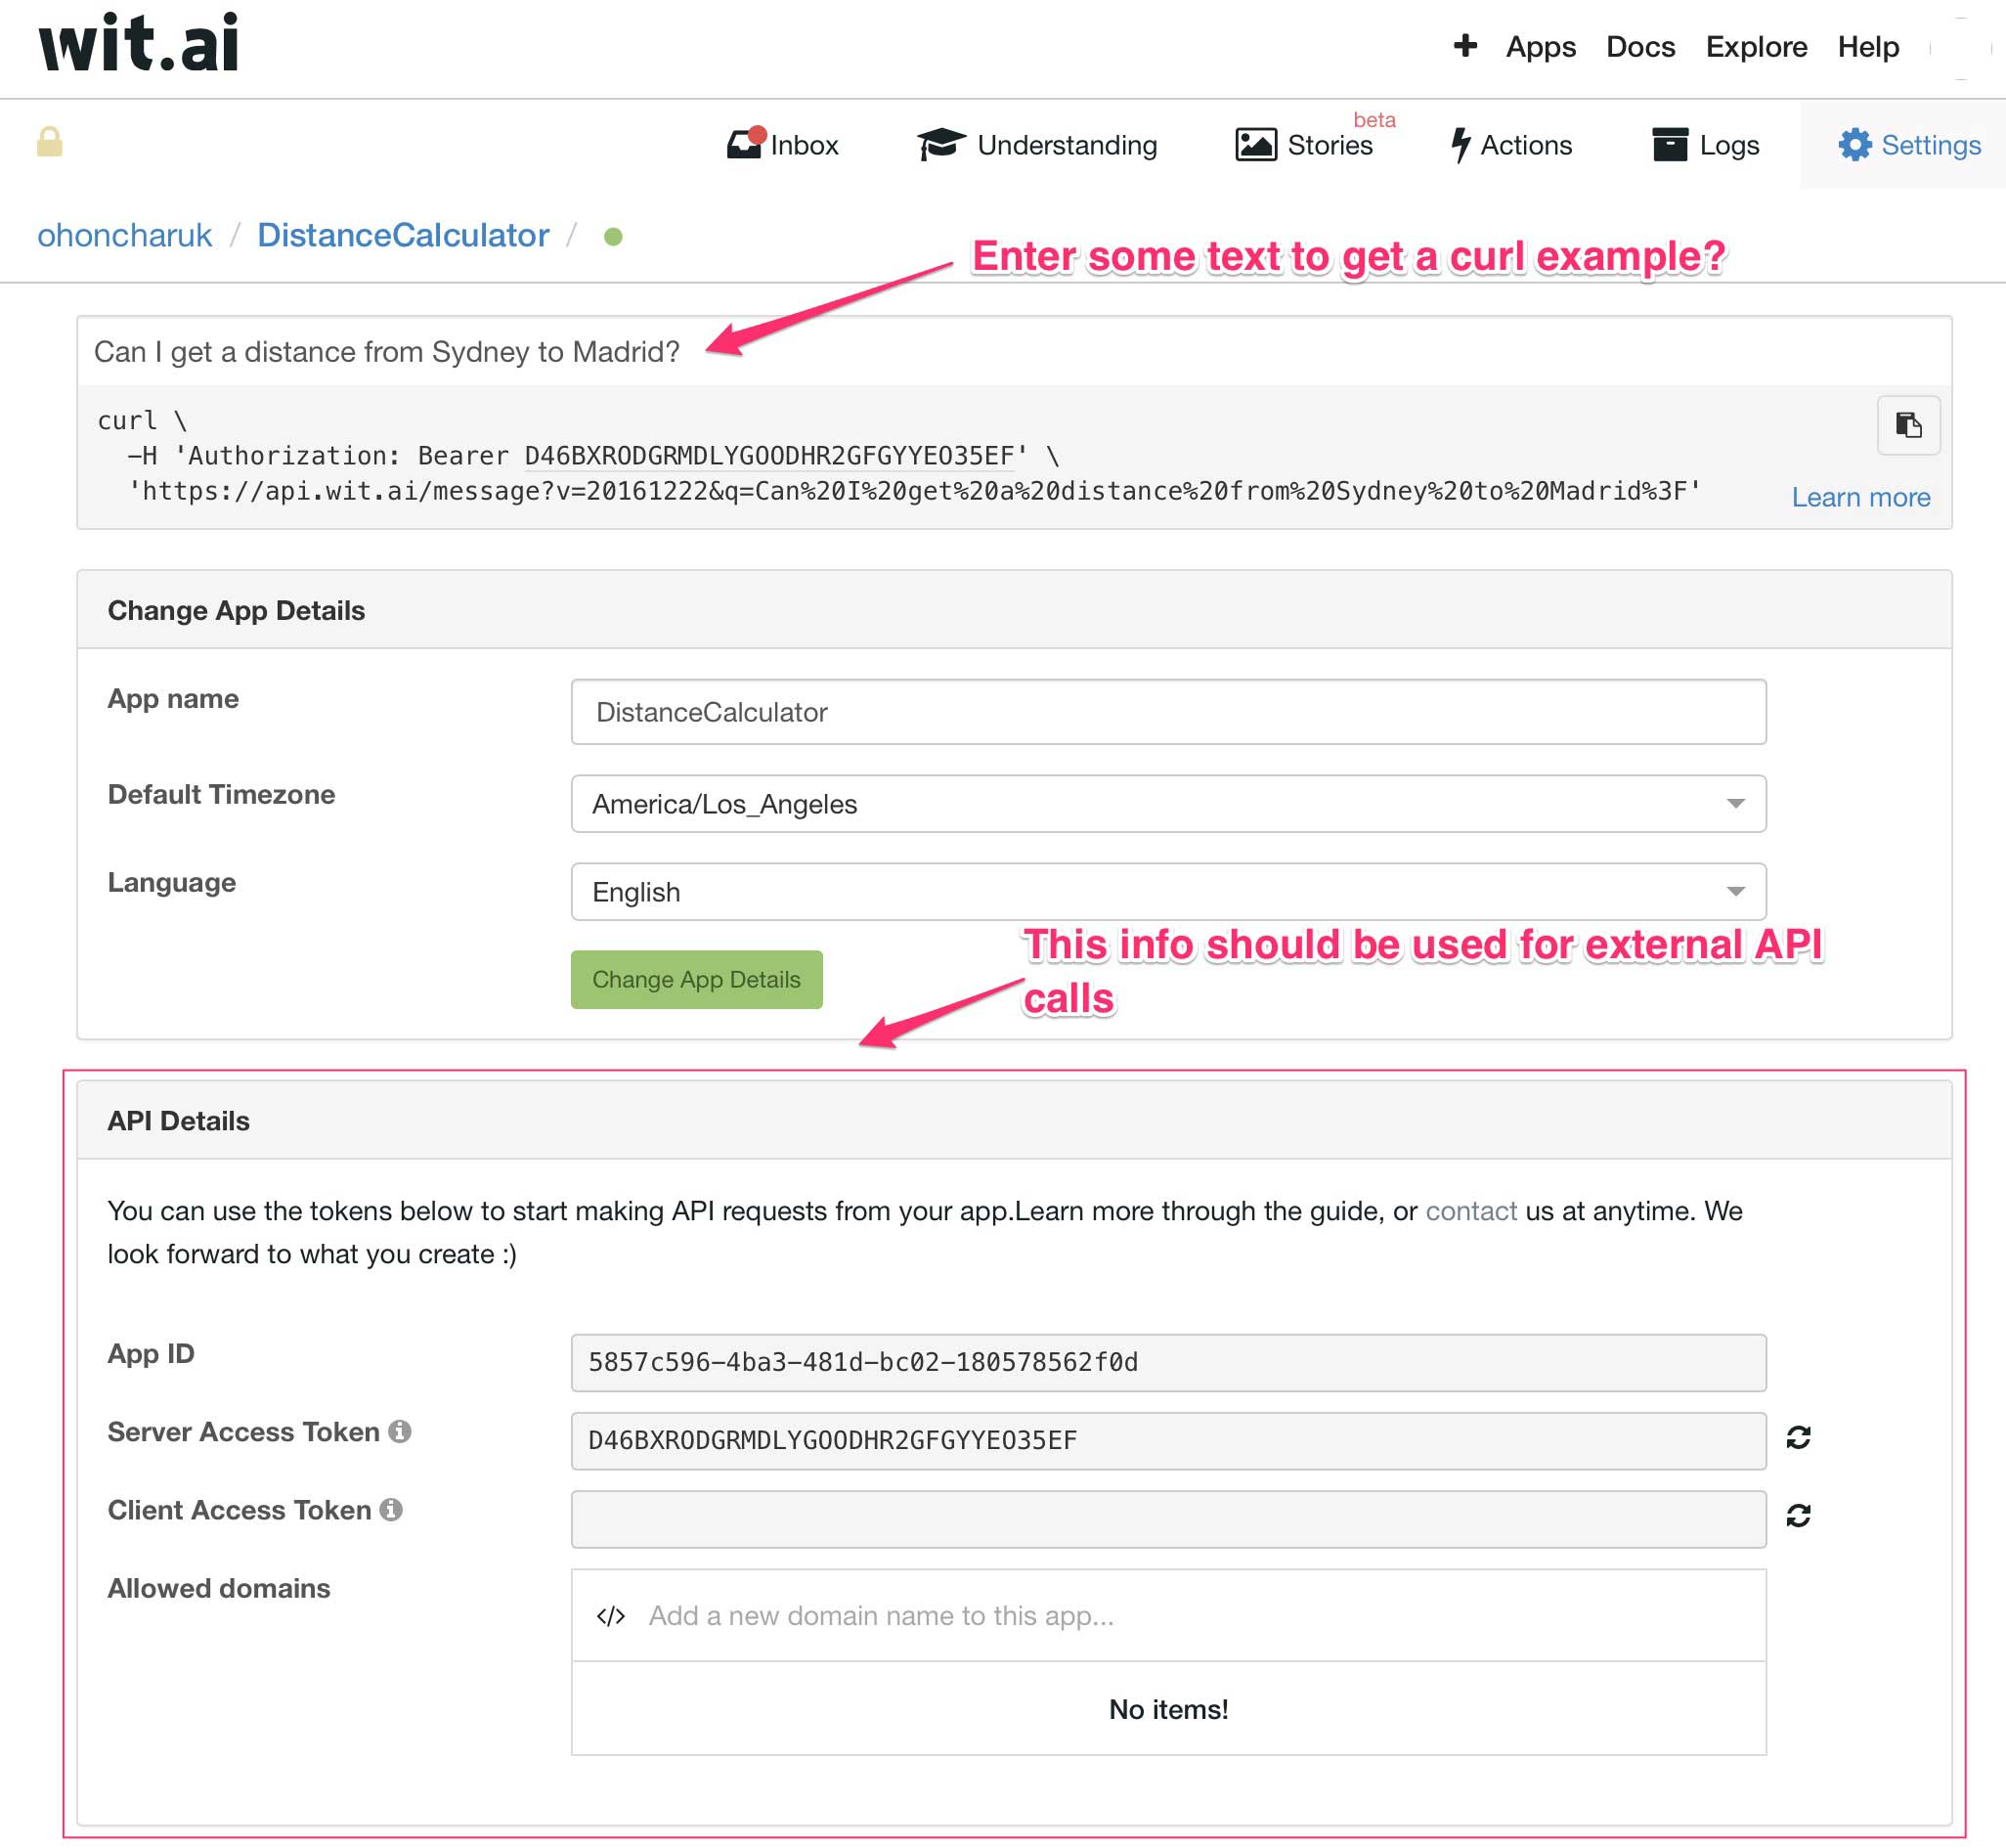
Copy a curl command and execute it from a console. Apparently, it returns a JSON data.
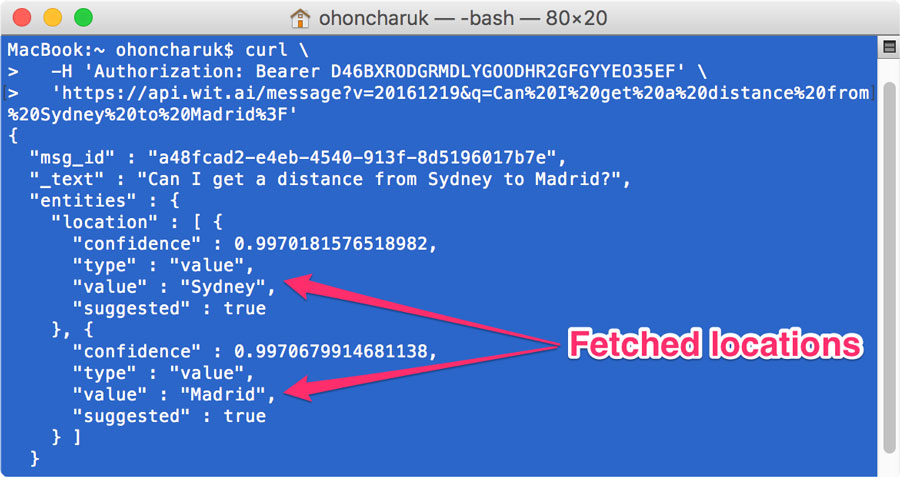
Unfortunately, there is no official wit.ai .NET client yet, through https://github.com/valencianok/Wit.ai.net can be used. I have no issues with it so far. Of course, you can use a plain HttpWebRequest class, but I prefer a way with wrapper. Having tried an example from Github, I’m able to get parsed city names.
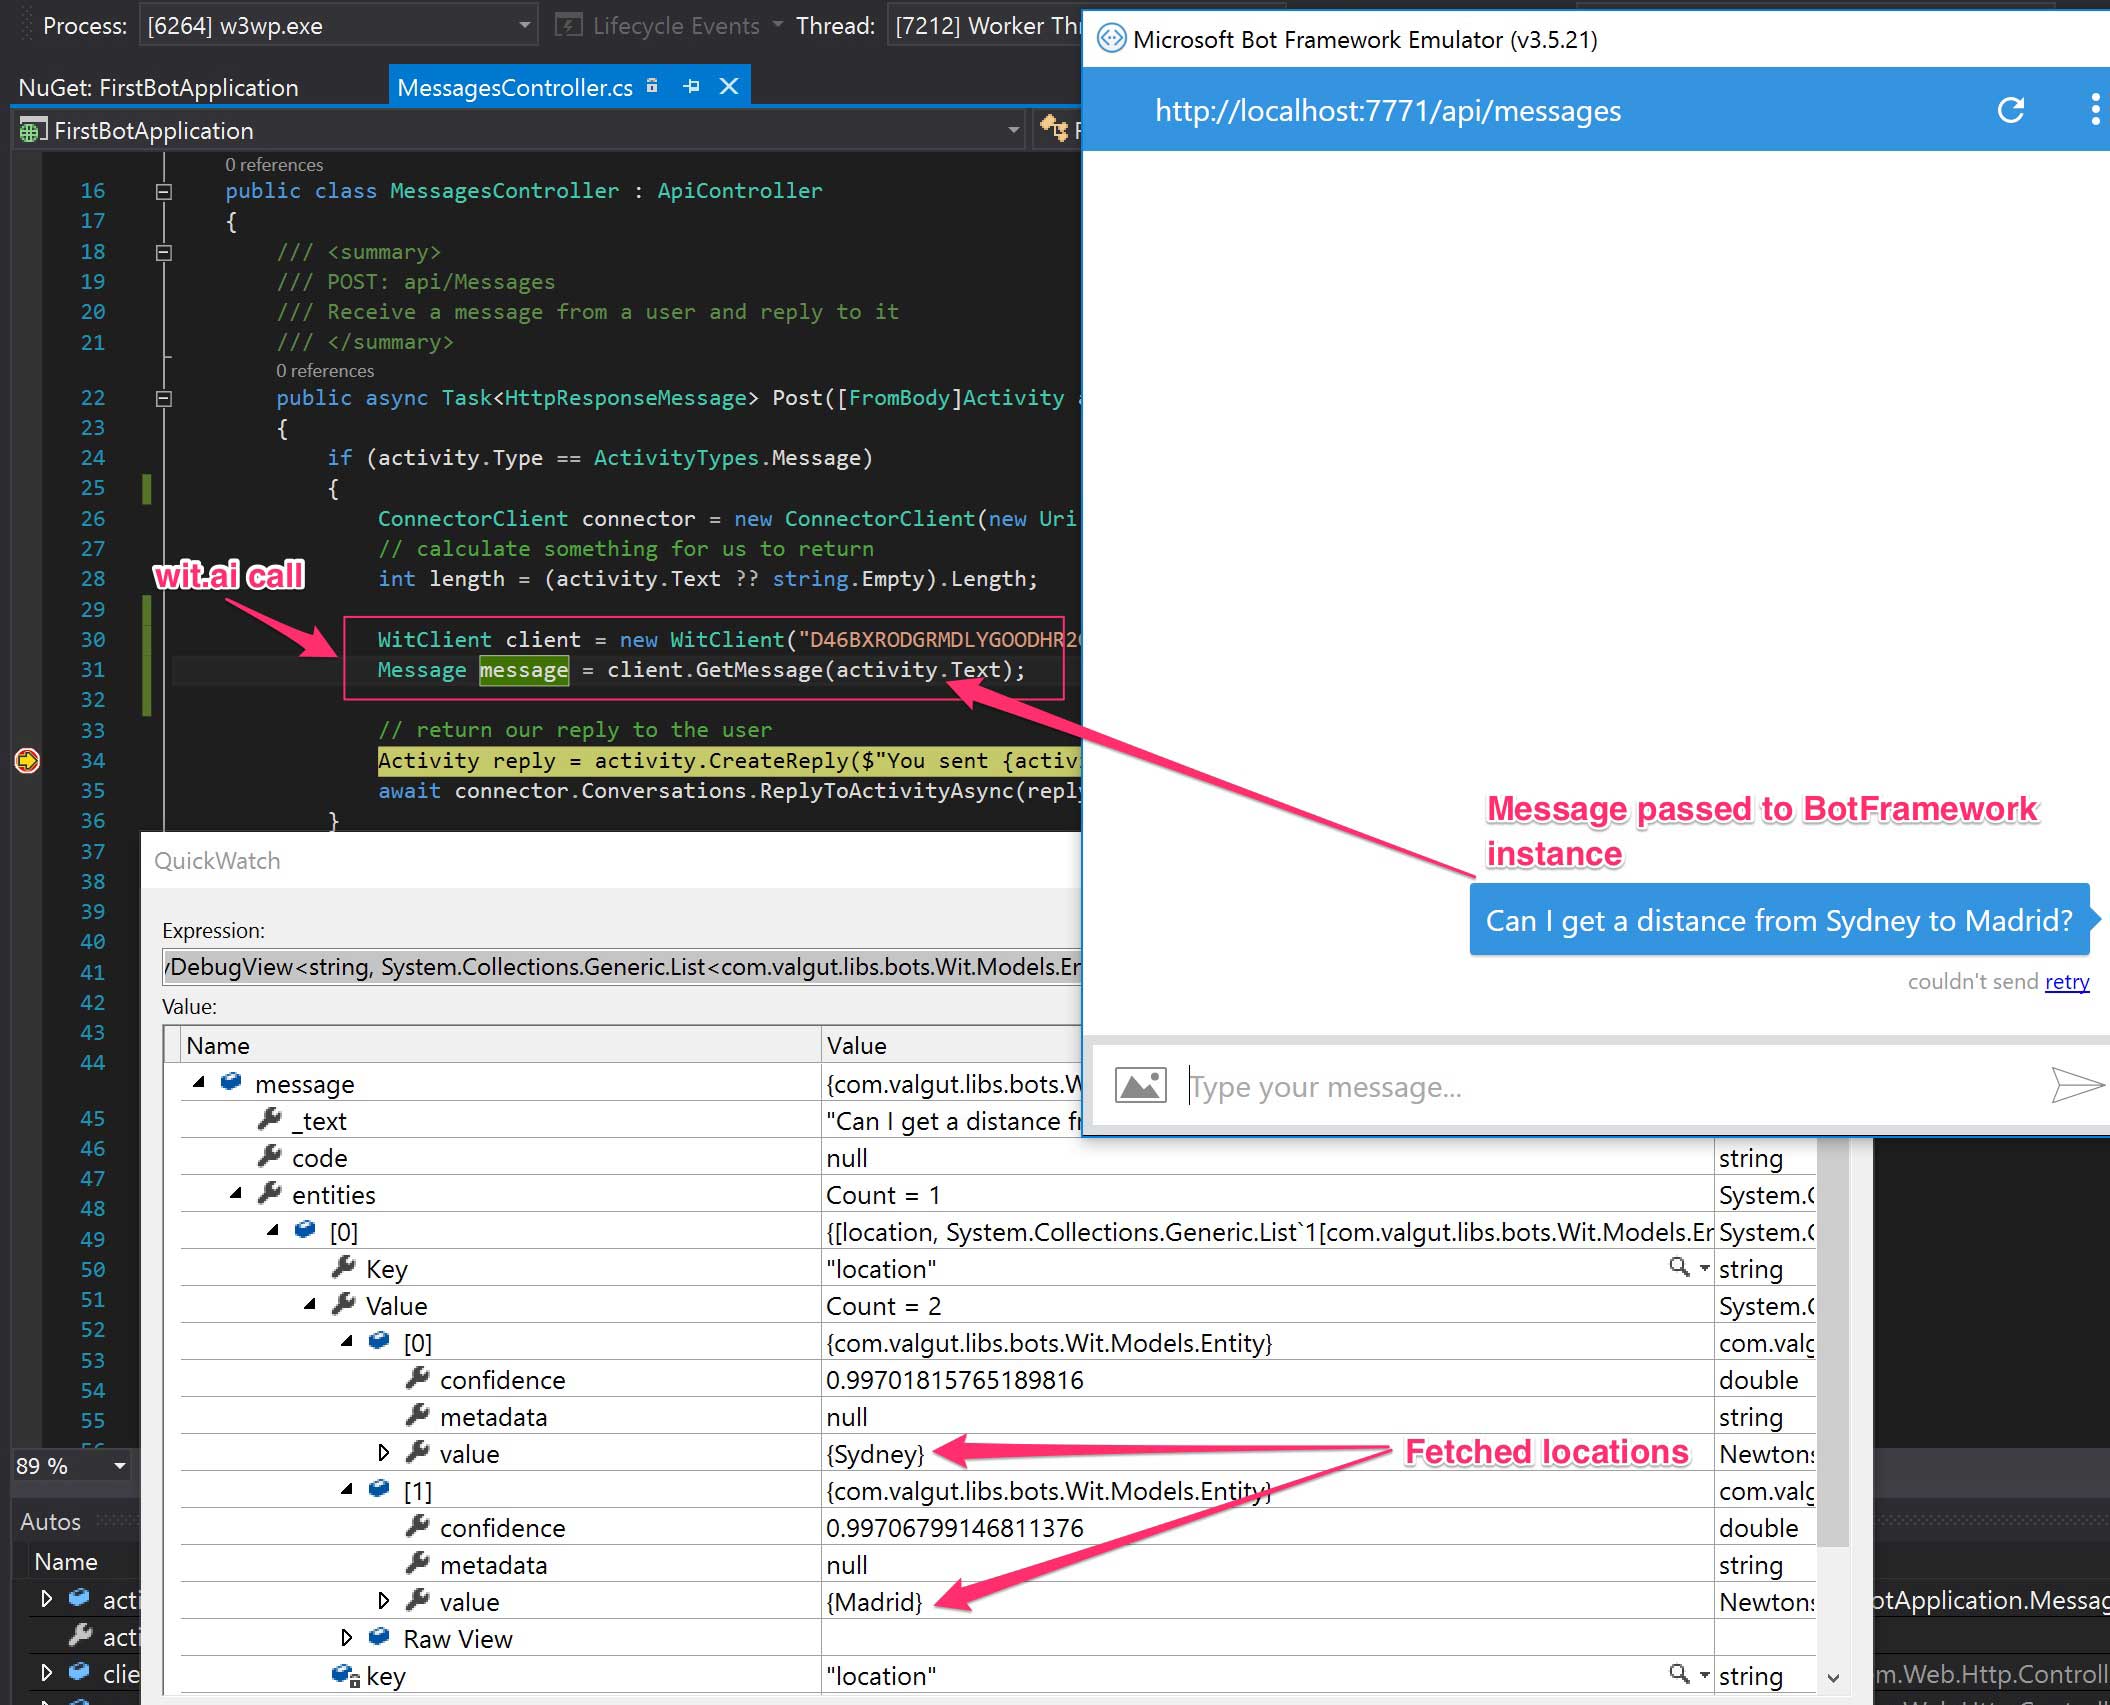
Please explore following snippet to see how it’s implemented. I use openstreetmap data to convert a city name to its GPS location.
public async Task<HttpResponseMessage> Post([FromBody]Activity activity)
{
    if (activity.Type == ActivityTypes.Message)
    {
        ConnectorClient connector = new ConnectorClient(new Uri(activity.ServiceUrl));
        // calculate something for us to return
        int length = (activity.Text ?? string.Empty).Length;

        WitClient client = new WitClient("D46BXRODGRMDLYGOODHR2GFGYYEO35EF");
        Message message = client.GetMessage(activity.Text);

        var city1 = ((JValue)message.entities["location"][0].value).Value.ToString();
        var city2 = ((JValue)message.entities["location"][1].value).Value.ToString();

        var dist = Distance(city1, city2);
        // return our reply to the user
        Activity reply = activity.CreateReply($"{dist.ToString()} km.");

        await connector.Conversations.ReplyToActivityAsync(reply);
    }
    else
    {
        HandleSystemMessage(activity);
    }
    var response = Request.CreateResponse(HttpStatusCode.OK);
    return response;
}

private static Tuple<double, double> GetCityLocation(string cityName)
{
    var url = string.Format("http://nominatim.openstreetmap.org/search.php?q={0}&format=json&limit=1", cityName);

    WebClient client = new WebClient { Encoding = Encoding.UTF8 };

    string reply = client.DownloadString(url);

    var json = (JArray)JsonConvert.DeserializeObject(reply);

    if (json.Count == 0)
    {
        throw new Exception("City not found.");
    }

    var lat = ((JObject)json[0])["lat"].Value<double>();
    var lon = ((JObject)json[0])["lon"].Value<double>();

    return new Tuple<double, double>(lat, lon);
}

public static double Distance(string from, string to)
{
    var locationFrom = GetCityLocation(from);
    var locationTo = GetCityLocation(to);

    GeoCoordinate fromLoc = new GeoCoordinate(locationFrom.Item1, locationFrom.Item2);
    GeoCoordinate toLoc = new GeoCoordinate(locationTo.Item1, locationTo.Item2);

    double distanceInKm = fromLoc.GetDistanceTo(toLoc) / 1000;

    return Math.Round(distanceInKm);
}
Testing
Registering a bot into Bot Directory
Microsoft has its own Bot Directory where you can connect your bot with various bot platforms, like Facebook, Telegram, Skype, Slack, etc.
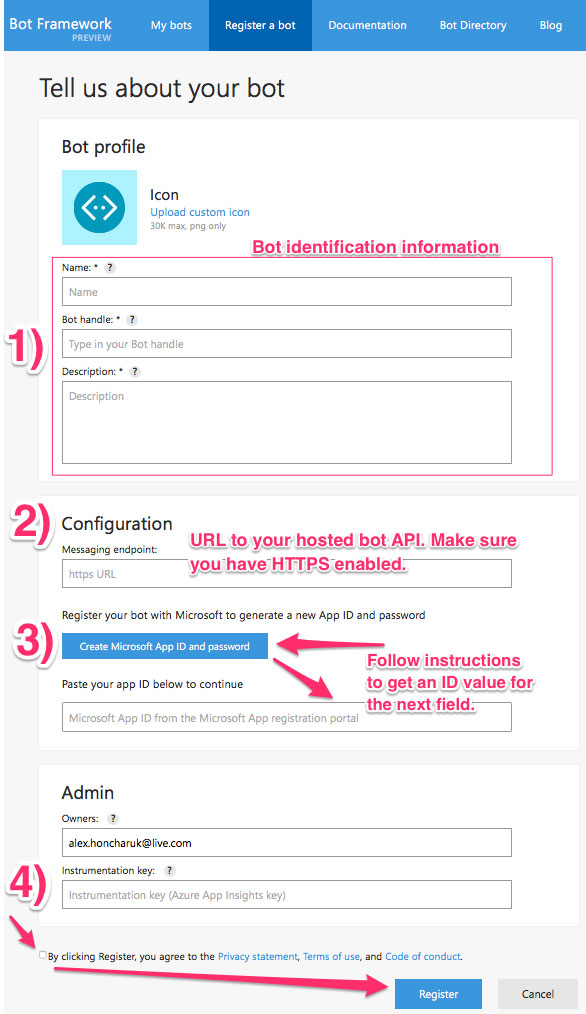
Go to https://dev.botframework.com site, login with your Microsoft ID and go to ‘Register a bot’ menu.
Then follow my instructions from the picture below.
Once you are done with bot creation, you can integrate it with other bot platforms:
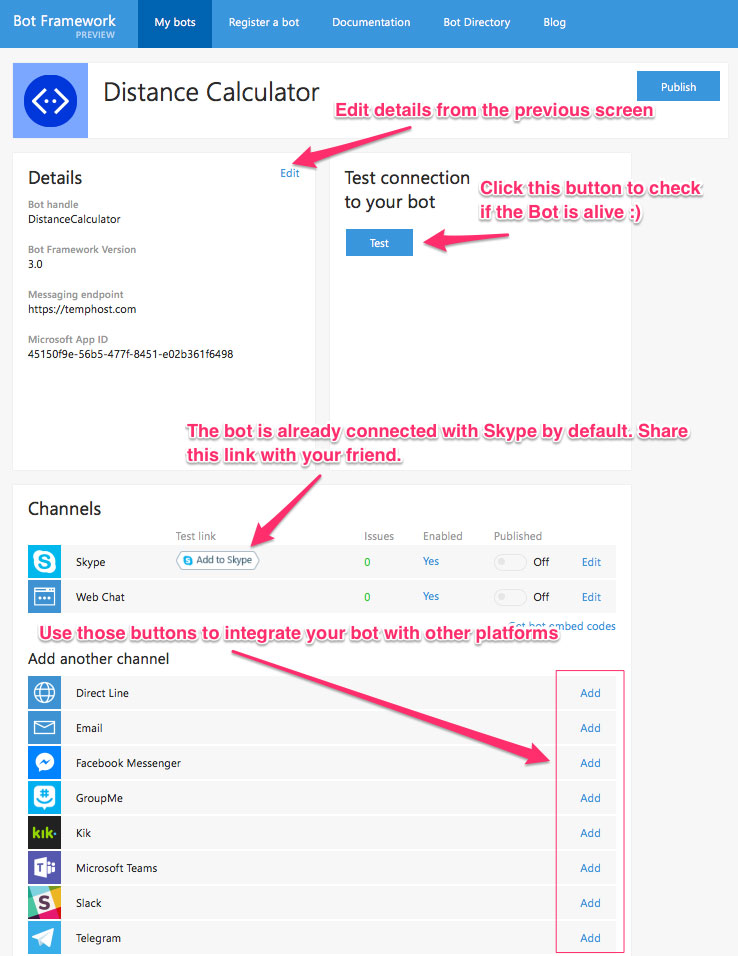
Now you are all set.
References
Share it on Twitter
Welcome to my page!
I do really appreciate your visit. Hopefully, you'll have a fun. Feel free to contact me in case of any questions.